I Modified a Differential to Fit CV Axles and Dual Disc Brakes on My Mini Buggy Build

A complete walkthrough of modifying a stock differential to accept CV axles and dual disc brakes for a handmade off-road mini buggy build.
Most people buy a differential and bolt it in. That's fine. But when you're building a mini buggy from scratch, the parts you can just bolt in are usually the parts that weren't designed for the job. So you modify.
That's where this build is at right now. What started as a standard differential has been reworked from the ground up to accept CV axles and carry dual disc brakes with dedicated calipers on each side. Every bit of it done in-workshop, by hand. Here's what that actually involves and why each choice matters if you're thinking about going down the same road.
Why Modify the Differential at All
A stock differential does its core job. It splits power between two outputs and lets the wheels turn at different speeds through a corner. Fine. But stock differentials are built around the stub axles, flange dimensions, and braking hardware that the original application required. Drop one into a purpose-built buggy and you're immediately fighting geometry, fitment, and weight distribution that was never meant for what you're building.
The two modifications here solve two separate problems. CV axle compatibility addresses drivetrain articulation. Dual disc brakes address stopping power and balance. They're related because both live at the same corner of the car, but the fabrication work for each is distinct.
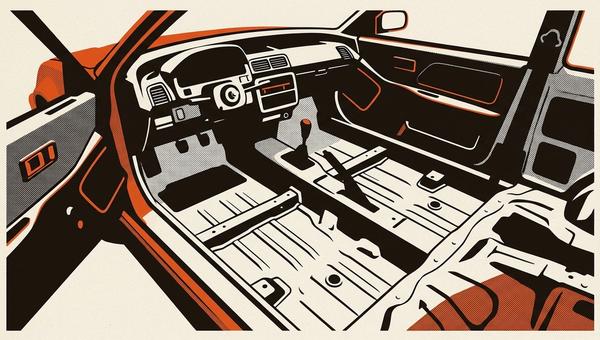
Getting the Differential Ready for CV Axles
CV joints are the right call for a buggy with any real suspension travel. A solid axle or a basic U-joint setup transmits vibration, fights you through articulation, and creates binding under droop. A CV axle handles angle changes smoothly across the full suspension stroke, which is exactly what you need when a wheel is dropping into a rut and you're still asking it to put power down.
The modification to accept CV axles starts at the output flanges on the differential housing. The original flanges need to be machined or replaced to match the bolt pattern and spline count of the CV axle shafts you're working with. Getting that spline interface right is not optional. A loose or mismatched spline will destroy itself, and it will do it at the worst possible moment.

Housing clearance matters too. CV axles have a larger joint diameter than a basic stub axle, and depending on the differential housing geometry, you may need to relieve material around the output to give the joint full angular travel without contacting the case. You find out where those contact points are by mocking everything up before final assembly and cycling the suspension through its full range by hand. If it binds anywhere, you address it then, not after it's welded in.
Mounting alignment is the other variable. The CV axle centerline needs to match the hub centerline with the suspension at ride height. If those aren't lined up, you're loading the joint at an angle it wasn't designed to carry under torque, and joint life drops off fast.
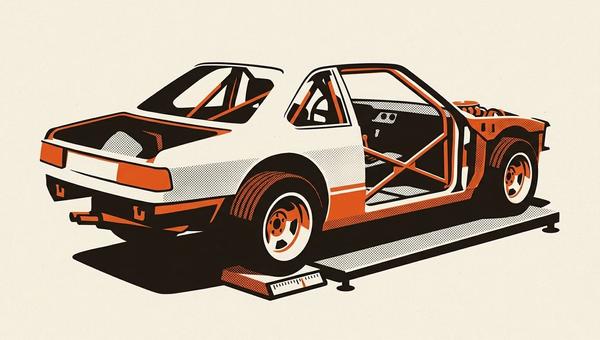
Dual Disc Brakes: Why Two and Not One
A single inboard disc on a rear differential is a common budget solution on small buggy builds. It works. You're not going to argue with it in a parking lot. But on a buggy that actually corners at speed on uneven terrain, a single shared disc has a real problem: it can't differentiate braking force between the two rear wheels.
When one rear wheel loses traction or lifts slightly, a single inboard rotor is braking both outputs through the differential. The wheel with grip gets the braking force it needs. The wheel without grip gets locked up and starts dragging. The result is unpredictable handling under braking, especially on loose or broken surfaces where this buggy is going to spend most of its time.
Dual outboard discs, one at each wheel, solve that. Each caliper operates independently. Each wheel gets braking force proportional to what that corner can actually use. Combined with whatever the differential's internal gearing does during cornering, the result is far more balanced and predictable.

The fabrication challenge with dual discs on a modified differential is caliper mounting. You need a bracket at each side that holds the caliper in correct alignment to the rotor, survives the loads, and doesn't interfere with the CV axle joint or the suspension linkage. That bracket has to be welded or bolted to something solid, and on a custom build, that something solid is part of whatever upright or trailing arm you've fabricated for that corner.
Rotor sizing is a practical decision. Bigger rotors absorb more heat and offer more mechanical advantage for the caliper, but they add unsprung weight and may not fit the envelope you have available inside the wheel. On a small buggy running modest speeds off-road, a modestly sized rotor is usually the right balance. The goal is consistent braking feel and fade resistance over repeated use, not maximum stopping power from highway speed.
What This Setup Gets You
When you add up the CV axle modification and the dual disc setup, you've built a rear end that can handle real suspension travel, put power down through articulation, and brake independently at each wheel. For a handmade off-road buggy, that's not a luxury spec. That's the baseline for a machine that's going to behave predictably when the terrain gets rough.
The honest cost is time and precision. Machining flanges, fitting splines, fabricating caliper brackets, aligning everything through the full suspension range. None of it is fast, and none of it forgives sloppy work. But if you're already building the whole car by hand, you're not in this for convenience.
This is the kind of build where the drivetrain tells you exactly what it's doing, because you designed and built every part of it yourself. That's the point.
Written by
Anna Buchanan